MfA Tricks #8 - Dragging around
Since Honeycomb, Android sports a very straightforward and easy to use API to do drag’n drop in your application.
Any View can be dragged and any other View can become a drop zone. You can attach information to your drag to be used by the receiver to do more processing afterwards.
The core of the API for drop zones is built around one event and several states. To declare a drop zone in Mono for Android, you simply need to attach an handler to the Drag event of your view (the same handler can be reused).
That handler will receive an View.DragEventArgs as a parameter where the important parameter will be its e.Event.Action property telling in which state the current drag process is with respect to you.
Following is one simple implementation of the method as a state machine with comment on each section to describe the nature of the state:
void HandleDrag (object sender, Android.Views.View.DragEventArgs e)
{
	var evt = e.Event;
	switch (evt.Action) {
	case DragAction.Started:
		/* To register your view as a potential drop zone for the current view being dragged
		 * you need to set the event as handled
		 */
		e.Handled = true;

		/* An important thing to know is that drop zones need to be visible (i.e. their Visibility)
		 * property set to something else than Gone or Invisible) to be considered. A nice workaround
		 * if you need them hidden initially is to have their layout_height set to 1.
		 */

		break;
	case DragAction.Entered:
	case DragAction.Exited:
		/* These two states allows you to know when the dragged view is contained atop your drop zone.
		 * Traditionally you will use that tip to display a focus ring or any other similar mechanism
		 * to advertise your view as a drop zone to the user.
		 */

		break;
	case DragAction.Drop:
		/* This is the state used when the user drops the view on your drop zone, if you want to accept
		 * it then set the Handled value to true like before.
		 */
		e.Handled = true;
		/* It's also probably time to get a bit of the data associated with the drag to know what
		 * you want to do with the information.
		 */
		var data = e.Event.ClipData.GetItemAt (0).Text;

		break;
	case DragAction.Ended:
		/* This is the final state where you still have possibility to cancel everything that happened.
		 * Generally though you will simply again set Handled to true.
		 */
		e.Handled = true;
		break;
	}
}
To initiate the drag and tell which View is being dragged, you use the StartDrag method on it. Generally this is done as part of a Click event handler (but anything else will do). This is also when you create the data you want to associate with the drag:
void HandleClick (object sender, EventArgs e)
{
	var data = ClipData.NewPlainText ("category", "value");
	StartDrag (data, new MyShadowBuilder (this), null, 0);
}
StartDrag takes as parameters your drag data, a shadow builder (more on that in a sec), a state object if you want one and a set of flag although right now they are unused (hence it should always be 0).
The interesting tidbit is the View.DragShadowBuilder parameter that lets you personalize the look of the drag shadow.
By default you can supply an instance of the class passing in your view to create a default drag shadow that will essentially be an image snapshot of your view with some transparency.
This mode is actually fine for most cases if you don’t want to bother.
Of course, what’s more interesting is that you can create your entirely custom drag shadows:
It’s actually pretty simple to do so as it’s very similar to normal View painting.
First, you need to create your own class deriving from View.DragShadowBuilder. Your constructor should take the dragged View and pass it down to the base constructor.
The two methods you then need to implement are OnProvideShadowMetrics and OnDrawShadow. In the first one you will give the measurements of your drag shadow and in the second, you will be given a Canvas to draw your shadow in.
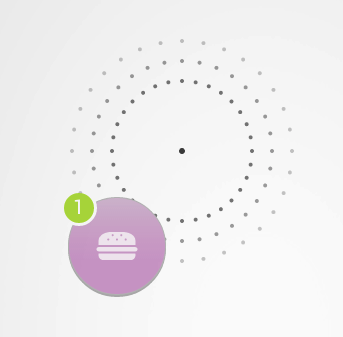
Here is my implementation of the drag shadow builder that produces the image above (with inline explanations):
class MyShadowBuilder : View.DragShadowBuilder
{
	const int centerOffset = 52;
	int width, height;

	public MyShadowBuilder (View baseView) : base (baseView)
	{
	}

	public override void OnProvideShadowMetrics (Point shadowSize, Point shadowTouchPoint)
	{
		width = View.Width;
		height = View.Height;

		// This is the overall dimension of your drag shadow
		shadowSize.Set (width * 2, height * 2);
		// This one tells the system how to translate your shadow on the screen so
		// that the user fingertip is situated on that point of your canvas.
		// In my case, the touch point is in the middle of the (height, width) top-right rect
		shadowTouchPoint.Set (width + width / 2 - centerOffset, height / 2 + centerOffset);
	}

	public override void OnDrawShadow (Canvas canvas)
	{
		const float sepAngle = (float)Math.PI / 16;
		const float circleRadius = 2f;

		// Draw the shadow circles in the top-right corner
		float centerX = width + width / 2 - centerOffset;
		float centerY = height / 2 + centerOffset;

		var baseColor = Color.Black;
		var paint = new Paint () {
			AntiAlias = true,
			Color = baseColor
		};

		// draw a dot where the center of the touch point (i.e. your fingertip) is
		canvas.DrawCircle (centerX, centerY, circleRadius + 1, paint);
		for (int radOffset = 70; centerX + radOffset < canvas.Width; radOffset += 20) {
			// Vary the alpha channel based on how far the dot is
			baseColor.A = (byte)(128 * (2f * (width / 2f - 1.3f * radOffset + 60) / width) + 100);
			paint.Color = baseColor;
			// Draw the dots along a circle of radius radOffset and centered on centerX,centerY
			for (float angle = 0; angle < Math.PI * 2; angle += sepAngle) {
				var pointX = centerX + (float)Math.Cos (angle) * radOffset;
				var pointY = centerY + (float)Math.Sin (angle) * radOffset;
				canvas.DrawCircle (pointX, pointY, circleRadius, paint);
			}
		}

		// Draw the dragged view in the bottom-left corner
		canvas.DrawBitmap (View.DrawingCache, 0, height, null);
	}
}
On a last note, you will notice that I’m painting the dragged View at the end of my OnDrawShadow method using the DrawingCache property. For that property to return something valid, you need to set the DrawingCacheEnabled property to true on the view.