A Tale of Connected Dots
This past week, we organized Evolve 2014 in Atlanta to talk about all things mobile with Xamarin.
Being a mobile conference, we of course made our own app so that attendees could track out the sessions and the geography of the event.
We also launched something a bit different in the form of a treasure hunt app. Thanks to Estimote, we used a combination of iBeacon and QR codes spread throughout the conference intertwined with challenges along the way until you reach the end of the quest and a special prize.
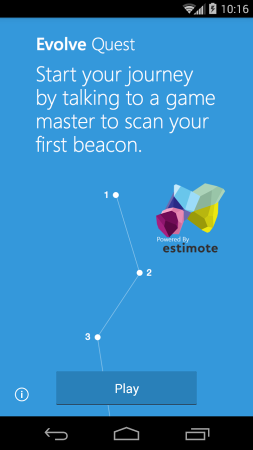
The main interface of that quest app is a serie of connected dots:
As you progress through the game, the content scrolls naturally to reveal more odd-shaped arrangement of those dots.
Originally, this screen was just a big tall image containing everything. This is suboptimal on Android for a couple of reason like some graphic chip not supporting big “texture” or simply the need to rescale at runtime on most screen.
Ultimately it’s also not fun because there is really nothing you can do with a big image.
Hint: this is NOT what we shipped (on Android at least).
Rather, what attendees could see on their Android phone at the conference was this:
A much more satisfying, softly animated, connected system of dots. The current game position is also highlighted with a discrete pulse.
We will open-source the entire Quest application at some point but I wanted to share how we did that specific bit that is entirely exclusive to Android.
Since this is a really custom animation, it’s a bit different than the other type of animation samples I have already shown.
For this type of thing, I usually rely on a very simple animator that gives me a floating value between 0 and 1 so that I can do my own tweening in code. I also manage to pass this value by hijacking one of the standard view animatable property so that I don’t need to expose more information to the Java bridge:
// Interpolator instantiation
shiverAnimator = ObjectAnimator.OfFloat (this, "scaleX", 0, 1);
shiverAnimator.RepeatCount = ValueAnimator.Infinite;
shiverAnimator.AnimationRepeat += (sender, e) => shiverIndex++;

// Property hijack
public override float ScaleX {
	get { return currentShiverInterpolation; }
	set {
		currentShiverInterpolation = value;
		Invalidate ();
	}
}
In our case, I then use this value to compute for each drawing pass an offset that is added to the base position of every dots:
// Expressed in dp units
int[] shiverOffsets = new[] { 9, 3, -8, 4, -7, 6 };

// Extra applied offset code
int ApplyShivering (int dotIndex, int value)
{
	var off = shiverOffsets [(dotIndex + shiverIndex) % shiverOffsets.Length]
		* currentShiverInterpolation;
	value += (int)Math.Round (off);
	return value;
}
The wave that you see on the highlighted pin comes from a GradientDrawable that I create from a shape drawable XML definition as follow:
<?xml version="1.0" encoding="utf-8"?>
<shape xmlns:android="http://schemas.android.com/apk/res/android"
	android:shape="ring"
	android:useLevel="false"
	android:innerRadiusRatio="2">
	<solid android:color="#99ffffff" />
</shape>
The reason for using a drawable like this is to avoid redoing common drawing code and also taking advantage of the ring shape type automatic radius scaling (notice the innerRadiusRatio attribute) to create a nice spreading effect as the ring grows larger.
The ring size and color is dynamically computed from a slightly interpolated (quadratic or accelerated) value coming from our shared shiver interpolator:
var dur = shiverAnimator.Duration / 4;
var fraction = (float)(shiverAnimator.CurrentPlayTime % dur) / dur;
// Cheap interpolation
fraction *= fraction;

var rippleRad = (int)(radius * (5 * fraction + 1)) - 8;
ripple.SetBounds (x - rippleRad, y - rippleRad, x + rippleRad, y + rippleRad);

var color = Color.Argb ((int)Math.Round (0x99 * (1 - fraction)),
                        0xFF, 0xFF, 0xFF);
((GradientDrawable)ripple).SetColor (color.ToArgb ());
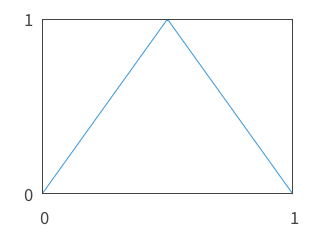
If you have been to my Mastering Time and Space session, you’ll likely also have detected the presence of a custom interpolator in there that is set on the shared shivering animator. The code is following:
class TriangleWave : Java.Lang.Object, ITimeInterpolator
{
	public float GetInterpolation (float input)
	{
		var t = input * 2;
		return (float)(2 * Math.Abs (t - Math.Floor (t + 0.5)) * (1 - 2 * Math.Floor (t)));
	}
}
This interpolator generates a triangle pattern that is repeatable (i.e. it both starts and ends at the same position for the dot) so that the animation can run continuously: