Android Material Image Loading
Among the plethora of seemingly impossible things in the Material Design specification, there is one that piqued my curiosity this morning.
It’s something everybody does at least once, if not everywhere, in his app which is loading and transitioning images.
Now to make this more glamour we generally all went with the classical, battle-tested approach of shifting the opacity of our image container to announce the change (that was even one of my first Android tip).
But the new approach taken by Material and detailed in the “Loading Images” section goes a lot further than this by also throwing some image levels manipulation in the mix.
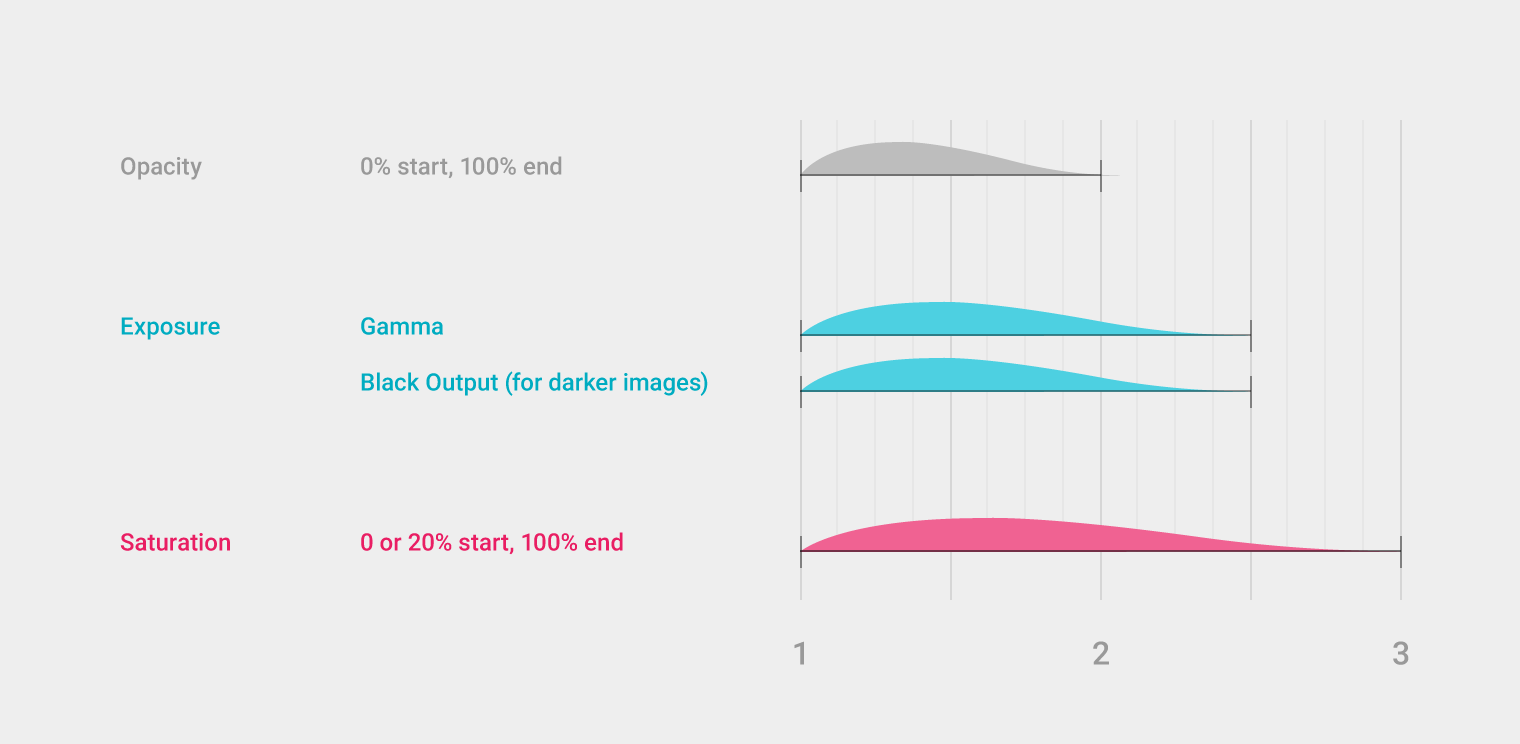
The process is summarized in the following graph:

It outlines a 3-steps process where a combination of opacity, contrast/luminosity and saturation is used in concert to help salvage our poor users eyesight.
Android has always supported image manipulation through the ColorFilter class that can be set on any drawable and on some view classes (ImageView for instance).
When used with its 4x5 ColorMatrix-based implementation ColorMatrixColorFilter, you can virtually implement any kind of image transformation provided you grok the way vector/matrix multiplication work (head to the ColorMatrix documentation for the resulting equations).
The only thing that was a limiting factor is that a filter is initialized once and for all. If you want to change the effect you need to create a new instance of the filter (which initialize a native counterpart) and replace the old version with the new one.
Obviously this is a complete downer when you do animations because you don’t want to stress out the GC and GPU during those phases by creating a new instance of the filter at every refresh step.
But thanks to Lollipop and the fact that @hide can’t stop us, there is actually a new public method allowing us to update a filter after the fact.
Armed with this knowledge, we can now set out to create a custom ITypeEvaluator to tweak our filter:
// Refer to http://developer.android.com/reference/android/graphics/ColorMatrix.html
// for a list of the matrix indexes
class AlphaSatColorMatrixEvaluator : Java.Lang.Object, ITypeEvaluator
{
	ColorMatrix colorMatrix = new ColorMatrix ();
	float[] elements = new float[20];

	public ColorMatrix ColorMatrix {
		get { return colorMatrix; }
	}

	public Java.Lang.Object Evaluate (float fraction, Java.Lang.Object startValue, Java.Lang.Object endValue)
	{
		// There are 3 phases so we multiply fraction by that amount
		var phase = fraction * 3;

		// Compute the alpha change over period [0, 2]
		var alpha = Math.Min (phase, 2f) / 2f;
		elements [19] = (float)Math.Round (alpha * 255);

		// We substract to make the picture look darker, it will automatically clamp
		// This is spread over period [0, 2.5]
		const int MaxBlacker = 100;
		var blackening = (float)Math.Round ((1 - Math.Min (phase, 2.5f) / 2.5f) * MaxBlacker);
		elements [4] = elements [9] = elements [14] = -blackening;

		// Finally we desaturate over [0, 3], taken from ColorMatrix.SetSaturation
		float invSat = 1 - Math.Max (0.2f, fraction);
		float R = 0.213f * invSat;
		float G = 0.715f * invSat;
		float B = 0.072f * invSat;

		elements[0] = R + fraction; elements[1] = G;            elements[2] = B;
		elements[5] = R;            elements[6] = G + fraction; elements[7] = B;
		elements[10] = R;           elements[11] = G;           elements[12] = B + fraction;

		colorMatrix.Set (elements);
		return colorMatrix;
	}
}
Here is how you can set it up:
var imageView = FindViewById<ImageView> (Resource.Id.image);
var drawable = (BitmapDrawable)Resources.GetDrawable (Resource.Drawable.monkey);
var evaluator = new AlphaSatColorMatrixEvaluator ();
var filter = new ColorMatrixColorFilter (evaluator.ColorMatrix);
drawable.SetColorFilter (filter);

var animator = ObjectAnimator.OfObject (filter, "colorMatrix", evaluator,
                                        evaluator.ColorMatrix,
                                        evaluator.ColorMatrix);
animator.Update += (sender, e) => drawable.SetColorFilter (filter);
animator.SetDuration (2500);
animator.Start ();
And here is the result:
It’s probably safe to assume Google will come out with an official way for this pattern e.g. in a subsequent support library update. In the meantime, you can get cracking with this version.