Exploring Android property animations
As mentioned in an earlier Xaminar, newer Android versions pack a lot of goodness for animations.
One of the new API I mentioned in the talk was property animations which let you “animate” any property on your objects including the non-graphical ones.
The corresponding class to that API is ValueAnimator (doc) and more precisely, in our case, its subclass ObjectAnimator (doc). Both let you construct animation over a range of normal scalar types like float or int for any property.
However, their true power lies in the fact that they can animate properties of any object type with the right configuration (more on that in the next section).
In addition, an often overlooked fact is that animations time behavior is not set in stone. Indeed, each of the animation API on Android can optionally take an TimeInterpolator (doc) which defines the time shape of the animations.
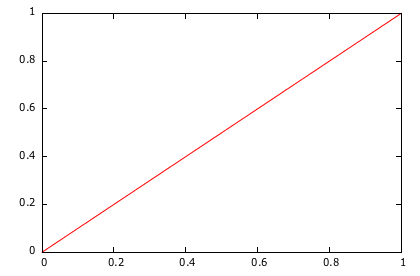
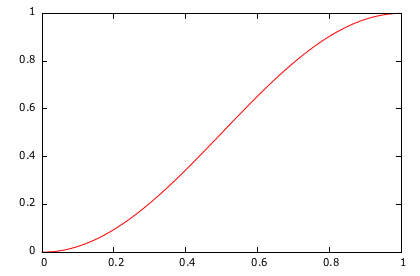
For instance, following are the respective time shapes of two of the default interpolators used in the framework, LinearInterpolator and AccelerateDecelerateInterpolator:
Creating your own time interpolator is also very easy. You simply have to inplement the ITimeInterpolator interface which has only one method: GetInterpolation(float).
The argument passed on that method is the current step of the animation which is a value between 0 (the start of your animation) and 1.0 (its end).
You are generally supposed to return a value in that range too but adjacent values are also supported and are being translated to an overshoot or an undershoot effect.
Additionaly, the formula you are using to compute your final value can be as complex as you want as long as it doesn’t impede the rendering loop (remember, for animations to be buttery smooth you want to aim for 60 FPS).
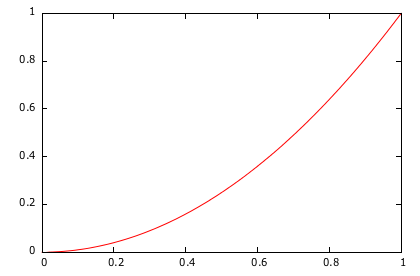
For instance, imagining I needed a time interpolator to represent the fall of an object (a typical quadratic equation), I could do it like that:
class QuadraticTimeInterpolator : Java.Lang.Object, ITimeInterpolator
{
	public float GetInterpolation (float input)
	{
		return input * input; // or (float)Math.Pow (input, 2)
	}
}
Which corresponds to the following shape:
So why is this useful?
Although you can generally use the default interpolator (AccelerateDecelerateInterpolator), if your animations are supposed to model a real-life phenomenon (like my example of an object falling) then you should strive to find the equation that faithfully reproduce the physical behavior your users expect.
Practical example
Let’s now see a practical example of the two features I mentioned about property animation: customized time interpolator and animating over non-scalar values.
For our experiment we are going to be using Google Maps v2 API and try to add a bit of spice to Marker objects which, by default, can’t be animated with the existing API.
The idea is to create a dropping effect for the pin:
I use this effect in Moyeu to inform the user of the result of his location search. The iOS Map application also use a similar effect for similar goals.
Since the only propery available to animate the pin is his latitude/longitude coordinates on the map we will have to determine a pair of geopoint respectively for the starting and ending position of a vertical movement.
Since the ending position is assumed to be known (i.e. we have the coordinates where the pin should be), we simply have to compute the initial offset of the pin when dropped.
With the Google Maps API, you can do these kind of display/map conversions using the Projection class available on your Map object. For instance computing the starting geocoordinates for our pin will be done like this:
// finalLatLng is known
var proj = mapFragment.Map.Projection;
var location = proj.ToScreenLocation (finalLatLng);
// We will start 35dp above the final position
location.Offset (0, -(35.ToPixels ()));
var startLatLng = proj.FromScreenLocation (location);
We now have two geocoordinates between which we want to animate the pin using its SetPosition(LatLng) method.
The problem is that by default the animation subsystem has no idea what a LatLng type is and how to create the intermediate values between our starting and ending points.
Fortunately, as I explained in the beginning, we can extend the animation framework to accept any type with a bit of help. This help is materialized by a subclass of the ITypeEvaluator interface.
The implementation of this interface is very similar in spirit to ITimeInterpolator with a single method to implement which gives you three parameters: the desired intermediate value (represented by a fraction value between 0.0f and 1.0f), the start object instance and the end object instance.
Your job as an implementer is to provide a linear interpolation based on fraction’s value between those two object states (the axiom being that fraction = 0.0f ⇔ result = startObject and fraction = 1.0f ⇔ result = endObject).
Here is the straightforward implementation of your evaluator for a LatLng object:
class LatLngEvaluator : Java.Lang.Object, ITypeEvaluator
{
	public Java.Lang.Object Evaluate (float fraction, Java.Lang.Object startValue, Java.Lang.Object endValue)
	{
		var start = (LatLng)startValue;
		var end = (LatLng)endValue;

		return new LatLng (start.Latitude + fraction * (end.Latitude - start.Latitude),
		                   start.Longitude + fraction * (end.Longitude - start.Longitude));
	}
}
The last piece is that we want the pin drop to feel as natural as possible. Instinctively, when you think about an object drop you can picture it accelerating until it reaches the ground and then gently bouncing until all is initial inertia is gone.
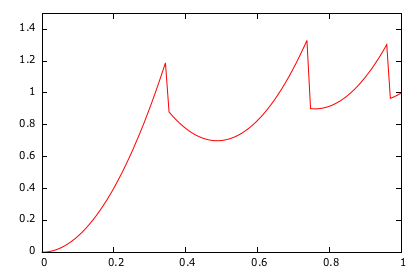
Now fortunately we don’t have to model ourselves this behavior because it’s already available in Android through the well-named BounceInterpolator class.
You can give a look to the formula implementation if you are interested but for the sake of the explanation I think the shape is a better illustration of the result:
So putting those two pieces together with our ObjectAnimator friend, we can now implement the solution very concisely like this:
var opts = new MarkerOptions () {
	Position = startLatLng,
	Icon = BitmapDescriptorFactory.DefaultMarker (BitmapDescriptorFactory.HueViolet)
};
var marker = mapFragment.Map.AddMarker (opts);

var evaluator = new LatLngEvaluator ();
ObjectAnimator.OfObject (marker, "position", evaluator, startLatLng, finalLatLng)
	.SetDuration (1000)
	.SetInterpolator (new Android.Views.Animations.BounceInterpolator ())
	.Start ();